A critical asset fails without warning. The entire production line grinds to a halt, and the immediate pressure is immense: fix it ASAP. For any experienced maintenance team, this scenario is all too familiar.
But getting the equipment back online is only part of the job. If you don’t understand why it failed, it’s only a matter of time before it happens again.
That’s where equipment failure analysis comes in. It’s a structured, step-by-step process that helps find the root cause of a failure so you can eliminate repeat issues, increase uptime, and make smarter asset management decisions.
In this guide, we will explore:
- When should failure analysis be done
- What does a typical failure analysis process look like
- Common methodologies applied
- Best practices that keep your findings credible and useful
- How Limble supports your failure analysis workflow
Let’s dive in.
Understanding the basics of failure analysis
Equipment failure analysis isn’t something you only do after a catastrophic breakdown. It’s a tool that should be used any time a failure has real consequences:
- The failure causes unplanned downtime on critical equipment
- There’s a safety risk or environmental impact
- The same issue has happened more than once
- The failure affects product quality or regulatory compliance
- The asset is high-value or hard to replace
- The downtime exceeds the set time or cost threshold (e.g., more than 4 hours of downtime or $10,000 in total cost)
- The failure was unexpected and can’t be explained by routine wear.
Who conducts equipment failure analysis? It depends on the complexity of the issue. An experienced technician or maintenance manager could handle a minor issue. However, most of the time, you’ll want a cross-functional team.

Not every failure justifies a full investigation. But when stakes are high — or when you’re unsure what caused the issue — failure analysis can save time, money, and headaches down the road.
Typical equipment failure analysis process
No two failure investigations are exactly the same. But they do follow a structure that helps teams stay organized, ask the right questions, and get to the root cause without jumping to conclusions.
Let’s walk through the typical steps using a rotary equipment failure as an example.
Example: A centrifugal pump fails during operation
You’re running a production batch when a critical centrifugal pump suddenly starts vibrating and shuts down. The line comes to a halt.
Here’s how the failure analysis process might unfold:
Step 1: Secure the scene and gather initial data
The maintenance team locks out the pump and collects key information: what the system parameters were before shutdown (flow rate, pump speed, suction/discharge pressure, vibration levels, etc.), and whether anyone heard any abnormal sounds.
Step 2: Preserve physical evidence
Before touching the equipment, they photograph the pump, suction and discharge lines, and the surrounding area. They collect fluid samples and download any sensor or SCADA data available. Nothing is disassembled yet.
Step 3: Assemble the investigation team
A cross-functional group is pulled in: a technician who performed the last PM, the reliability engineer, and the person monitoring the system. Each offers a unique perspective on what could have gone wrong.
Step 4: Analyze what failed, how it failed, and why
Disassembly reveals a cracked impeller and signs of cavitation on the casing. A review of system logs shows the pump ran dry briefly the night before. Further digging finds that a faulty level sensor in the supply tank was providing false readings.
Step 5: Validate findings with data
Sensor data confirms multiple instances of low suction pressure. Maintenance logs show no recent inspections of the level sensor, and operators confirm strange readings from the level sensor in the supply tank (sudden drops or jumps).
Step 6: Develop corrective and preventive actions (CAPA)
The team replaces the impeller, installs a redundant level sensor, and sets up an alert in Limble CMMS for abnormal suction pressure. A new PM task is added to inspect all level sensors monthly.
Step 7: Document and share findings
All findings, photos, and recommendations are logged in Limble under the pump’s asset profile. The case is reviewed in the next maintenance meeting and added to internal training materials for new techs.
Common methodologies for analyzing equipment failures
Failure analysis isn’t an exact science — it’s part engineering, part investigation, and part craft. Every failure tells a story, and it’s your job to figure out what really happened.
But even though every situation is different, you still need structure. Over the years, engineers and reliability professionals have developed proven methodologies that help teams stay objective and avoid jumping to conclusions.
Below are some of the most widely used failure analysis techniques. Each one has its strengths and limitations. Which one you should apply depends on the complexity of the failure, the type of asset, available internal resources, and the level of detail you need.
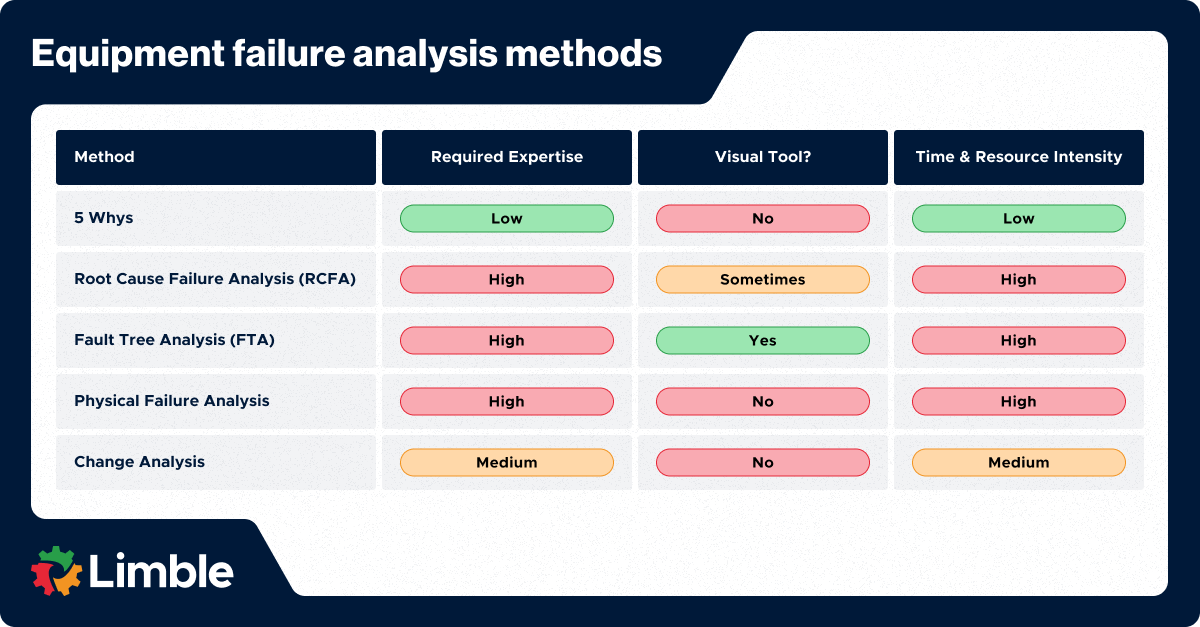
1. 5 Whys
The 5 Whys is a simple but powerful technique that helps you get past surface-level symptoms to uncover the underlying cause of a failure. As the name suggests, you ask “why?” repeatedly — up to 5 times is usually enough — until you arrive at the root cause.
It’s fast, intuitive, and doesn’t require any special tools or training. You’ll often see the five whys used during kaizen events or as part of a quick post-mortem following downtime.
Ideal use cases:
- Simple or recurring failures that don’t involve multiple systems
- Investigating failures of non-critical equipment
- Frontline troubleshooting by technicians and operators.
Potential limitations:
- Risk of stopping too early — teams may settle for the first “plausible” cause
- Can lead to oversimplification in complex failures
- Lacks structure for documenting evidence or validating findings
- Relies heavily on the facilitator’s skill and objectivity.
2. Root cause failure analysis (RCFA)
RCFA is a structured, in-depth method used to identify the underlying cause of complex or high-impact failures. It focuses on gathering hard evidence, understanding failure mechanisms, and ensuring that corrective actions prevent recurrence.
It often uses a combination of tools — like failure mode and effects analysis (FMEA), cause-and-effect diagrams, and physical inspections — to build a complete picture of what happened and drive systemic improvements.
Ideal use cases:
- Critical equipment failures with high downtime or safety risks
- Recurring issues that haven’t been solved by standard troubleshooting
- Failures that require cross-functional input or formal documentation
- Industries like oil and gas, aerospace, utilities, and pharma where failures have serious regulatory or financial consequences.
Potential limitations:
- Time- and resource-intensive — requires detailed evidence collection and team collaboration
- Can be overkill for simple failures
- Results can vary depending on team experience and process discipline
- Needs a strong leader to keep discussions focused and avoid bias or dead ends.
3. Fault tree analysis (FTA)
FTA is a top-down, logic-based method that starts with a specific failure event and works backwards to map out all potential causes. It’s visual, systematic, and great for analyzing complex failures with multiple contributing factors.
The process uses logic gates (like AND and OR) to show how different events or conditions combine to trigger a failure.
Ideal use cases:
- Complex systems where multiple failures must occur in sequence or combination
- Situations involving software, automation, or control systems
- High-risk industries like aerospace, nuclear, and chemical processing
- Investigations where a visual breakdown of failure logic helps build consensus.
Potential limitations:
- Can be complex and technical, especially for teams without prior experience
- Requires detailed knowledge of the system
- Can be overkill for straightforward mechanical failures
- Doesn’t provide insights into human or procedural errors unless those are mapped in.
4. Physical failure analysis (destructive/non-destructive)
Physical failure analysis involves examining the actual failed component — either by non-destructive or destructive methods — to uncover how and why it failed. This is hands-on, evidence-based work that may include microscopic inspection, material testing, X-rays, or lab analysis.
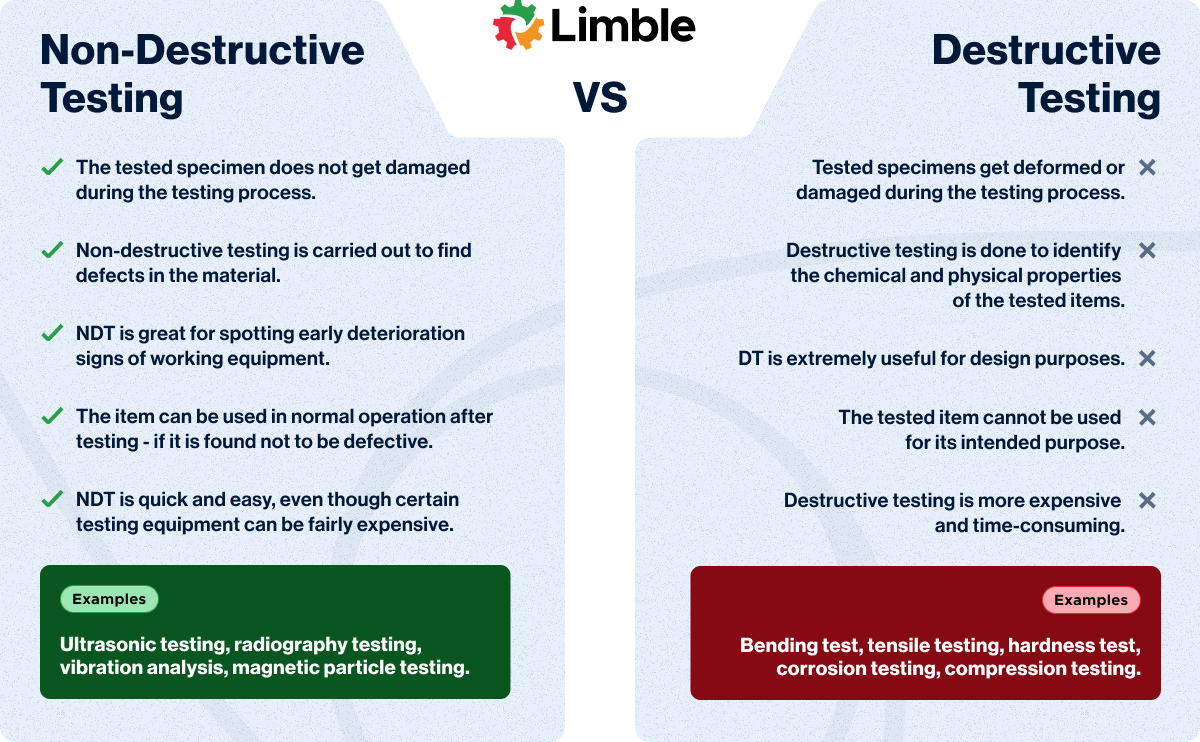
It’s often used in conjunction with other techniques like RCFA to confirm theories or discover failure mechanisms like fatigue, corrosion, or material defects.
Ideal use cases:
- Failures involving fractures, wear, or material degradation
- High-value components where failure must be understood in detail
- Industries like aerospace, automotive, semiconductors, and electronics
- When you need forensic-level insight into the failure mechanism.
Potential limitations:
- Destructive methods permanently alter or destroy the component
- Can be costly and time-consuming, especially if lab testing is needed
- Doesn’t always reveal the root cause — only how the part failed, not necessarily why
- Requires specialized testing equipment and expertise.
5. Change analysis
Change analysis focuses on identifying what changed before a failure occurred. The idea is simple: if something was working fine before and suddenly failed, some change must have happened — in materials, processes, environment, people, or settings.
By comparing the current (failed) state to the previous (normal) state, teams can isolate changes that may have introduced new risks or conditions that led to failure.
Ideal use cases:
- Failures that occur right after a modification, maintenance, or equipment upgrade
- Situations where nothing else seems to explain the issue
- Industries where multiple teams interact with equipment — like food processing, manufacturing, or utilities
- Analyzing unexpected failures after a long history of stable operation.
Potential limitations:
- Doesn’t work well when multiple changes happen at once
- Can miss root causes if the team focuses only on obvious or recent changes
- Relies heavily on thorough documentation of system conditions before and after the change
- May not be suitable for failures caused by gradual wear or long-term degradation.
Best practices for conducting equipment failure analysis
The quality of your failure analysis depends entirely on the discipline and expertise your team brings to the investigation. Skipping steps or making assumptions might get you a quick answer — but not a reliable one.
By following these best practices, you’ll ensure every investigation leads to evidence-backed solutions.
1. Have a clear objective in mind
What are you trying to accomplish? Take a step back and define the goal of your analysis:
- Are you trying to prevent a recurrence?
- Meet a compliance requirement?
- Improve the design or maintenance process?
Being clear on the purpose helps your team set the right scope, ask the right questions, and avoid wasting time on unnecessary details.
Quick example: Let’s say a gearbox on a mixer fails. If your objective is to meet compliance, your focus will be on documentation, traceability, and corrective actions. If you’re trying to improve reliability, you might expand the analysis to include maintenance intervals, lubrication practices, and operating conditions across similar gearboxes.
2. Preserve the evidence and document everything
If possible, don’t start repairs until documentation is complete.
Ideally, your team should have time to:
- Take high-resolution photos from multiple angles.
- Record surrounding conditions — fluid leaks, smells, temperatures, and nearby components.
- Save failed parts, related materials, and sensor data logs.
- Note any settings, alarms, or anomalies from control systems.
- Log every step of disassembly, with notes and photos.
- Write down relevant observations from technicians and operators.
Pro tip: Create a pre-made failure analysis kit that can be quickly brought to a failure site. It can include sample bottles, evidence bags, tags and labels, a high-resolution camera, a logbook, and barrier tape.
3. Document everything and keep a chain of custody
You can’t know upfront which detail will be important, so the rule is simple: record everything.
Imagine you’re documenting a failed bearing. Don’t just write “bearing failed.” Instead:
- Note its exact location.
- Describe the condition of the seal.
- Record the color and texture of the grease.
- Check for heat discoloration or misalignment.
- Take clear photos from multiple angles, before cleaning or removing anything.
Also, if you’re collecting physical evidence, maintain a transparent chain of custody — especially if the failure has regulatory or legal implications.
Bottom line: Good documentation protects you from bad assumptions.
4. Involve the right people in the process
One can never hold the whole picture, especially when dealing with a complex piece of equipment and interconnected systems. Many different roles can contribute to the process.
Here’s who you should consider including:
- Operators: They know how the equipment was behaving before and during the failure.
- Maintenance and engineering staff: They bring insight into repair history, known issues, and technical specs.
- Quality assurance: Helps assess if product integrity or compliance was affected.
- Design/manufacturing engineers: Can spot potential design flaws or build issues.
- Safety experts: Identify risks to personnel or processes.
- Reliability engineers: Often lead the analysis, look at failure patterns, tie it all together, and recommend long-term fixes.
5. Establish a timeline of events
One of the fastest ways to make sense of a failure is to reconstruct what happened, when, and in what order. A clear timeline helps identify critical moments, link symptoms to causes, and separate coincidence from causality.
Ask questions like:
- When was the last time the equipment ran normally?
- Were there any recent changes, PMs, or repairs?
- Did anyone notice unusual behavior before the functional failure?
- What actions were taken immediately before and after it failed?
Let’s say a pump motor fails. You start digging and uncover this sequence:
- Monday: Preventive maintenance was done, including motor alignment.
- Wednesday: Operators reported a strange vibration.
- Thursday morning: The motor trips due to overload.
- Thursday afternoon: The motor fails completely.
That timeline tells you the warning signs were there — and that the maintenance work may have introduced the issue.
6. Distinguish between the failure, the mechanism, and the cause
People performing the equipment failure analysis should be able to maintain a clear distinction between these three concepts:
- The failure is what broke (e.g., a drive shaft fractured).
- The mechanism is how it broke (e.g., fatigue cracking from repeated stress).
- The root cause is why the conditions for the mechanism existed (e.g., misalignment introduced during a rushed installation).
Pro tip: Use a simple “What-How-Why” framework. Ask yourself: What failed? How did it fail? And why did that failure mechanism occur? These three layers guide your team from surface-level symptoms to the actual root cause.
7. Validate hypotheses with data
It’s easy to fall into the trap of believing the most logical or convenient explanation. But a solid failure analysis backs up every conclusion with objective evidence.
Here’s what you should use to validate your findings:
- Physical evidence from the failed part
- Sensor and operational data (temperature, pressure, load, runtime, etc.)
- Inspection and test results
- Historical maintenance records
- Simulation or modeling, if applicable.
If your hypothesis doesn’t line up with the available data, it’s time to dig deeper or reframe your assumptions.
A good rule of thumb: If someone outside your team reviewed your analysis, would they reach the same conclusion based on the evidence? If not, your investigation isn’t done yet.
8. Communicate findings clearly
An equipment failure analysis report should be structured, easy to follow, and backed by solid evidence. Here’s a simple format that works:
- Executive summary: What happened and what needs to be done.
- Description of the failure: The basic facts and timeline.
- Methodology used: How the analysis was conducted.
- Root cause(s): What was discovered.
- Supporting evidence: Photos, data, observations.
- Corrective and preventive actions (CAPA): What changes are being made and who’s responsible for implementing them.
Don’t forget to store your report somewhere accessible. With Limble, for example, you can attach all investigation notes, photos, and reports directly to the asset’s profile — creating a single source of truth for future reference.
Finally, add findings to your failure database or internal knowledge base so other teams can learn from it. That’s how a good investigation becomes an investment in long-term equipment reliability.
Limble CMMS: The foundation for effective failure analysis
A modern CMMS like Limble gives your team the structure, data, and visibility needed to investigate failures efficiently — and prevent them from happening again.
Here’s how Limble supports every stage of the failure analysis process:
- Capture a complete failure history: Every work order, PM, and meter reading is automatically logged against a specific asset. That gives your team the context and historical data needed to spot recurring problems and identify the conditions leading up to a failure.
- Centralize all documentation and evidence: Stop digging through emails, folders, or spreadsheets. Instead, attach photos, notes, failure codes, sensor logs, and final reports directly to the asset’s profile — making everything easy to find when it matters most.
- Turn recommendations into action: An analysis is most valuable when it leads to change. Limble makes it easy to create, assign, and track the corrective action work, as well as update PM checklists, procedures, and schedules.
- Identify trends with powerful reporting: Use Limble’s customizable dashboards and reports to track failure trends across assets, lines, or facilities. This high-level view helps you prioritize your analysis efforts where they’ll make the biggest impact.
Top reliability teams use Limble CMMS to build data-driven maintenance programs that prevent failures before they happen.
Start for free today and get the data you need to replicate their success.