How To Create An Asset Hierarchy
Your assets are the lifeblood of your operation. But when you have hundreds, or even thousands of them, efficient asset tracking and management become very challenging.
Having a well-thought-out parent-to-child asset hierarchy built inside your maintenance software is the most efficient way to organize your asset information.
Let’s dive in to check some asset hierarchy examples and see how you can create one within your CMMS system.
What is an asset hierarchy?
An asset hierarchy represents a systematic way to structure an organization’s asset information. It lists all physical assets, categorizes them, and groups them logically. Most asset hierarchies create a top-down structure using a parent-child relationship.
This helps management control and allows quick and easy access to asset information while improving data analysis.
An asset hierarchy is not limited to a single location or department, as it can be company-wide and across multiple countries. In these circumstances, the hierarchy structure will include geographical or departmental locations.
While you could create an asset hierarchy in a spreadsheet, the optimal approach requires the use of a computerized maintenance management system (CMMS).
Asset hierarchy example for a warehouse
Following is an example of the structure of an asset hierarchy for a warehouse, showing part of the heating, ventilation, and air conditioning system (HVAC) and the compressed air system.
Note that we’ve shown only two complete pathways for brevity and that the thermostat ends in a serial number, having no maintainable parts, while the compressor goes a level deeper.
The warehouse will have multiple systems like power, water, and lighting. Each system will include multiple pieces of equipment and sub-units.
This example makes it easy to understand how large the asset hierarchy can be for a complex plant, underscoring the need for digitalization.
CMMS asset hierarchy example
The CMMS will record the location of each part, including the time at which the technician installed the item. You will have access to overhaul details, purchased date, supplier info, and any other data you decided to track.
Below is a short video that shows how you can quickly build an asset hierarchy inside Limble CMMS using our drag and drop and duplicate functionalities.
Besides being able to quickly find the right asset information, properly structuring assets inside your CMMS helps you generate and compare detailed maintenance reports for assets, components, and their subcomponents.
You can track maintenance costs, metrics like MTTR and MTBF, the improvements or decreases in reliability, and similar.
ISO 14224 asset hierarchy benchmark
While no generic benchmarks exist for the development of asset hierarchies, some standards cover the topic, including ISO 55000 and 14224. ISO 14224 relates to the petroleum and natural gas industries, and covers the collection and exchange of reliability and maintenance data for equipment.
However, it has since gained wide acceptance as a de-facto reference for establishing an asset hierarchy. It describes an information structure, providing suggested data categories and formats.
You can use it as a reference while building your own asset hierarchy.
7 steps for creating an asset hierarchy
Defining your asset hierarchy is not difficult, but it requires a systematic approach and consideration of several important points.
It helps if you already have an existing (and accurate) asset register.
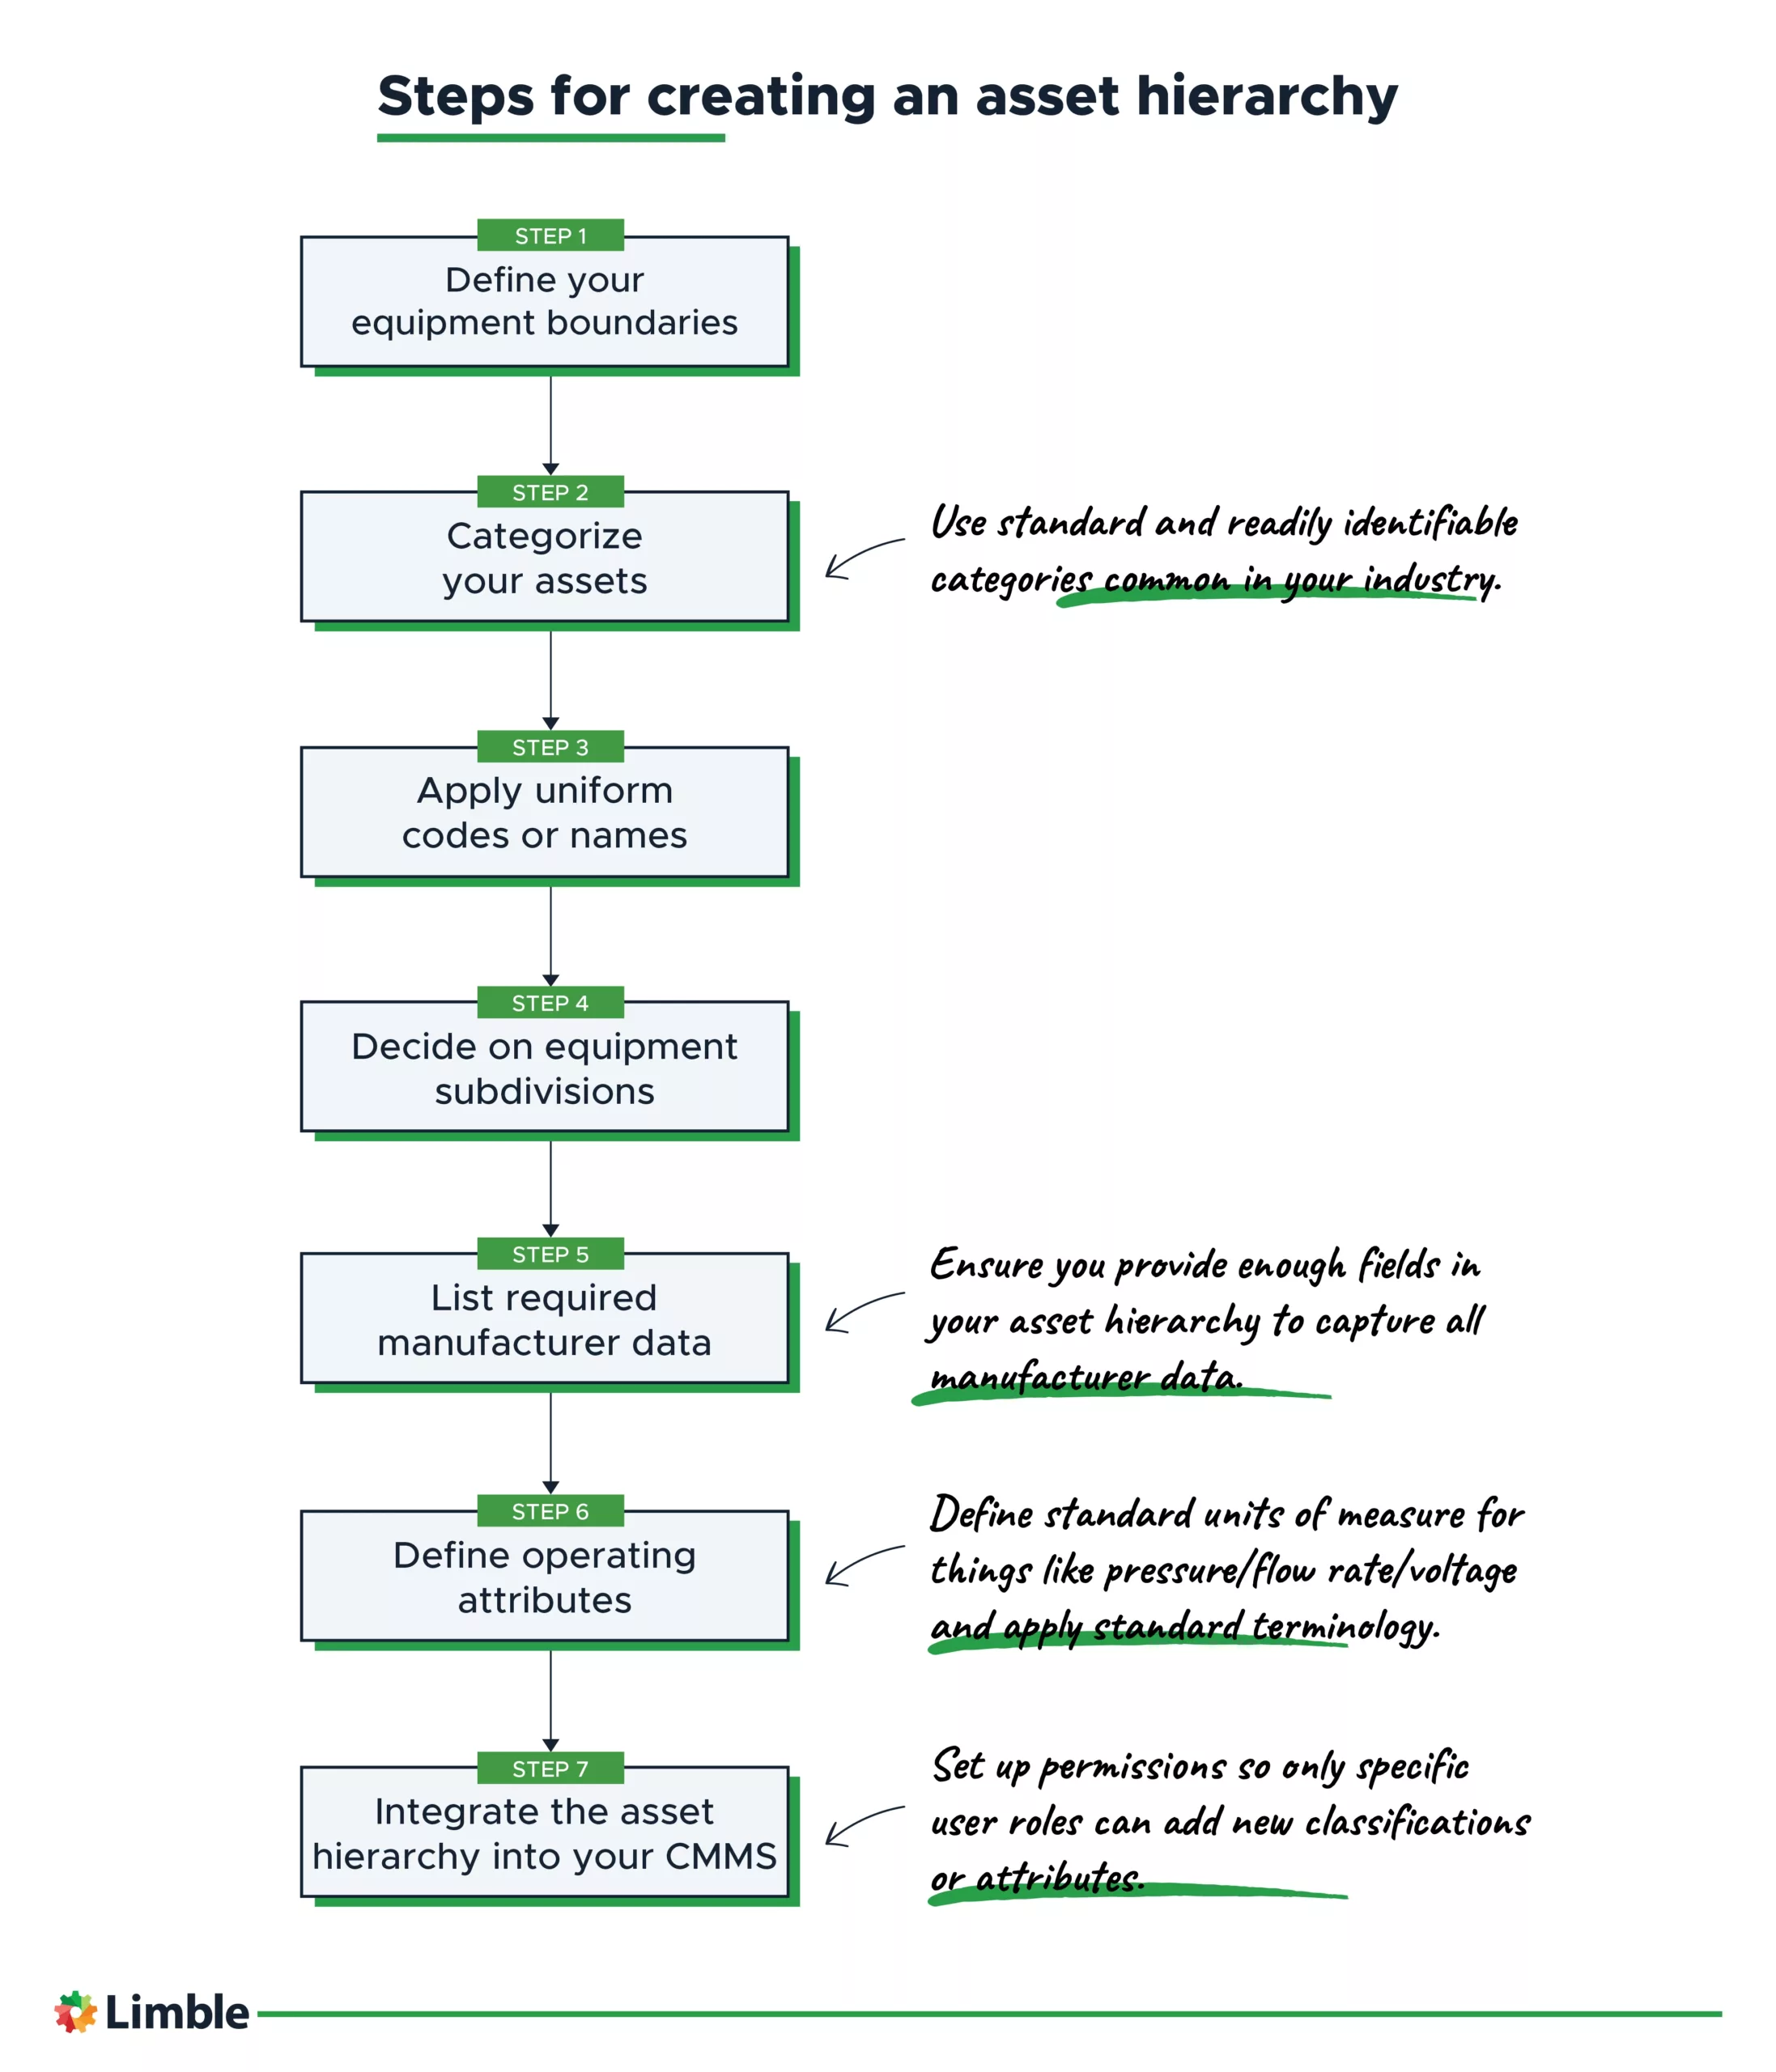
Step 1: Define your equipment boundaries
Clearly define the rules by which you categorize a system.
Imagine you have two departments that share the same compressed air system. You need to consider:
- Where are the boundaries at which the change in department occurs?
- If you have an electric motor driving a pump, does a motor form part of the electrical system or the pumping circuit?
- If a leak occurs at a boundary connection, does it belong to the connected device or is it within the system boundary?
You must clearly identify and define these rules to prevent user confusion and data corruption.
Step 2: Categorize your assets
You can use a system to categorize your assets as we did in the diagram above, or to create a class of assets — like Pumps.
Use standard, readily identifiable categories common in your industry. Trying to personalize categories to your business will introduce jargon and confusion, making it hard to integrate new hires, and causing outside contractors to be less efficient.
In our example asset hierarchy, we defined HVAC as the system, with pumps as one of the children. Three different pump types are sub-units of the generic “pump” category, with each of them composed of individual components.
Step 3: Apply uniform codes or names
Create standardized names and codes for your equipment to allow easy identification and meaningful analysis. Adherence to a naming convention prevents people from inventing their own abbreviations or failure codes that will ruin your data integrity.
Your CMMS can enforce this discipline by forcing technicians to select names/codes from a predefined list.
ISO 14224 has some helpful naming examples in Appendix A you can use as a reference.
Step 4: Decide on equipment subdivisions
Use a standard list of equipment sub-units. For instance, you may decide a generic compressor has the following sub-units:
- Compressor
- Control and monitoring
- Receiver
- Air treatment
- Power transmission
- Miscellaneous.
In your CMMS, be sure to apply these sub-units to all compressors, even if the compressor is a simple unit that doesn’t have great complexity.
You may not use the sub-units entries, but maintaining the attributes is important for data integrity. Avoid devising different sub-units with customized attributes for equipment in the same category.
Step 5: List required manufacturer data
Ensure you provide enough fields in your asset hierarchy to capture all manufacturer data. Some manufacturers use part and serial numbers to identify their components; others add a model number. Some even include codes to indicate component modification states.
This information is critical when analyzing failure modes, calculating reliability, or understanding maintenance costs.
Step 6: Define operating attributes
There will be specific data that applies to a sub-unit. This data might include pressure and flow rates for hydraulic components, or voltage and current for electrical devices.
Define standard units of measure you’ll need to enter for such information. Is the energy consumption in watts, kilowatts, or megawatts, or will all three need to be offered as a choice? There is a standard terminology that you should use: W, kW, or MW.
Where units are case-sensitive, having one component shown as 10 kW and another incorrectly as 10 KW counts as two different units, with any search or analysis potentially missing one component.
Step 7: Integrate the asset hierarchy into your CMMS
Once the asset hierarchy is in your CMMS, it becomes the standard to which everyone must conform. When a new asset is purchased and loaded into the system, the only selections you can make will be those identified in the hierarchy.
The CMMS will not allow everyday users to invent new classifications or attributes. Those permissions can be enabled/disabled for different CMMS user roles.
For this reason, be rigorous in designing the structure to encompass all current requirements. An administrator will have to edit the structure if you buy new equipment that doesn’t fit into the current hierarchy.
In these cases, review the entire asset hierarchy to avoid isolated changes to the existing structure.
The benefits of a well-structured asset hierarchy
Having all of your physical assets listed in a parent-to-child hierarchy streamlines your business processes, providing numerous benefits:
- One centralized database of all assets. Having a single database reduces the risk of data duplication and obsolescence, allowing easy management and backup for data security purposes.
- Single source of truth for all departments. A central asset hierarchy built into a CMMS provides a single source of truth. Every department has access to the same maintenance data, preventing data silos that cause errors and discrepancies.
- Enhanced data analysis. Using a standardized structure and naming convention ensures searches and analyses pull up all the assets complying with the terms entered, ensuring data integrity.
- Improved productivity. A well-thought-out asset hierarchy provides all employees with a quick and easy way to find the required asset data.
- Better cost control. Having all assets listed in a particular structure facilitates detailed cost comparisons between similar assets. It also allows you to drill down to component and subcomponent levels to understand capital, lifecycle, maintenance, and disposal costs.
Long story short, taking your time to build a proper asset hierarchy is worth the trouble. Paired with a flexible, modern CMMS software, it will significantly improve your enterprise asset management.
Optimize your asset management hierarchy with Limble CMMS
The combination of a well-structured asset hierarchy and a CMMS is important for every business seeking to optimize its asset management processes.
While creating an asset hierarchy involves forethought and rigorous discipline, flexible CMMS software like Limble makes sure the whole process is very straightforward.
Don’t hesitate to reach out or schedule a quick product demo to learn more about Limble CMMS and its ability to simplify and streamline your asset management operations.
1 Comments
-
Global Aviation Infrastructure LLC February 13, 2023, 10:22 pm
Thanks for sharing this post with us. Really very helpful and nice informative post it was.
Leave a Comment